Thursday, May 8, 2014

DIY Craft Table with Store Bought Items


YES, It's here and to me... SO exciting.

This lovely gem is something I've been wanting to make FOREEEVER. This is one of the first projects I wanted to do once we bought our home. I am extremely crafty (if you couldn't tell by now) and this was a must for one of our spare bedrooms! I kind of took over one of the rooms into my "craft room". Well, that is until little babies start running around, and no I don't know when that'll happen ;). It really wasn't that expensive to "build" and didn't take any time at all to put together. Unfortunately for Bryan (my husband) he got recruited to help put the side storage tables together. Surprisingly it was very easy and we put it together literally in 15 min, for both. Usually when you grab those in box furniture do-dads from Walmart or Target it takes an army of brains to figure out how to put together. Not these little babies! Now, if you're like me and want a great work space, or maybe use it as a custom desk or something this is perfect for you. Continue reading on if you want to see how I did it in a couple of days. :)


First things first... I bought two of these espresso square 4 Cube Organizer's from Walmart for $34. I thought about using the three shelf bookcases that they have there for $19 (which would work perfectly as well), but they didn't have the color I wanted and I'm very impatient when I have a vision in my head. Plus, Bryan was like "um, you should get these, they're sturdier." So taking my man's advice since I'm no genius when it comes to building stuff I got these guys. More expensive? Yes. Stronger? YES. = better work space. 


Door from Lowe's. #0010710 "LAUAN FLUSH" dementions 1-3/8" HC36" X 80"


For a table top I decided to go with a plain ol' door. We were at Lowe's and I just so happened to see this beaut for $10 on clearance in the door section. Success. As soon as I saw it, I knew this project was going down. I'm not the type of person to buy stuff full price. Most of the time I buy everything on clearance if I can. This door was what made the project go boom, in a good way. Basically because I knew that I had something great to work with.


Look familiar? Yup, it's left over awesomeness from my DIY Dresser Makeover . <-- be sure to check that out. Anyways, details are:
  • Martha Stewart Living Metallic Paint in Thundercloud (Home Depot) $4
  • Behr Stain Blocking Primer & Sealer (Home Depot) $7
  • Minwax Fast Drying Polyurethane Clear Coat (Walmart) $7


Bought the paint pans, roller, and roller pad at Walmart. I think the paint pan was $1.89 and the Roller was $3, and then the extra roller pads were $3. Also snagged some "L" brackets from Lowe's, pack of 4 (with screws) for $2. The roller pads I got are the "Ultra Smooth Surfaces". Pretty much perfect for this bare door. 


I primed the door (just the top and sides) about 3 coats. Waited 45 min in between coats to dry completely. Then with a new roller brush pad I painted the door with the Thundercloud paint.... now that took about 3-4 coats as well. I like things to be very pigmented and opaque so I like to make sure it's definitely on there.


Now, for the Polyurethane Clear Coat (which was a smell I didn't like), I did 3 coats of this as well. This took probably the most time out of everything. When it's drying it takes forever, like pull your hair out with boredom forever. So I did as many as I could one day, let it dry over night and did the last coat. I used one of the ultra smooth roller pads as well for this. It made the perfect glossy look, and will also help protect the paint and door from water && other liquids etc.


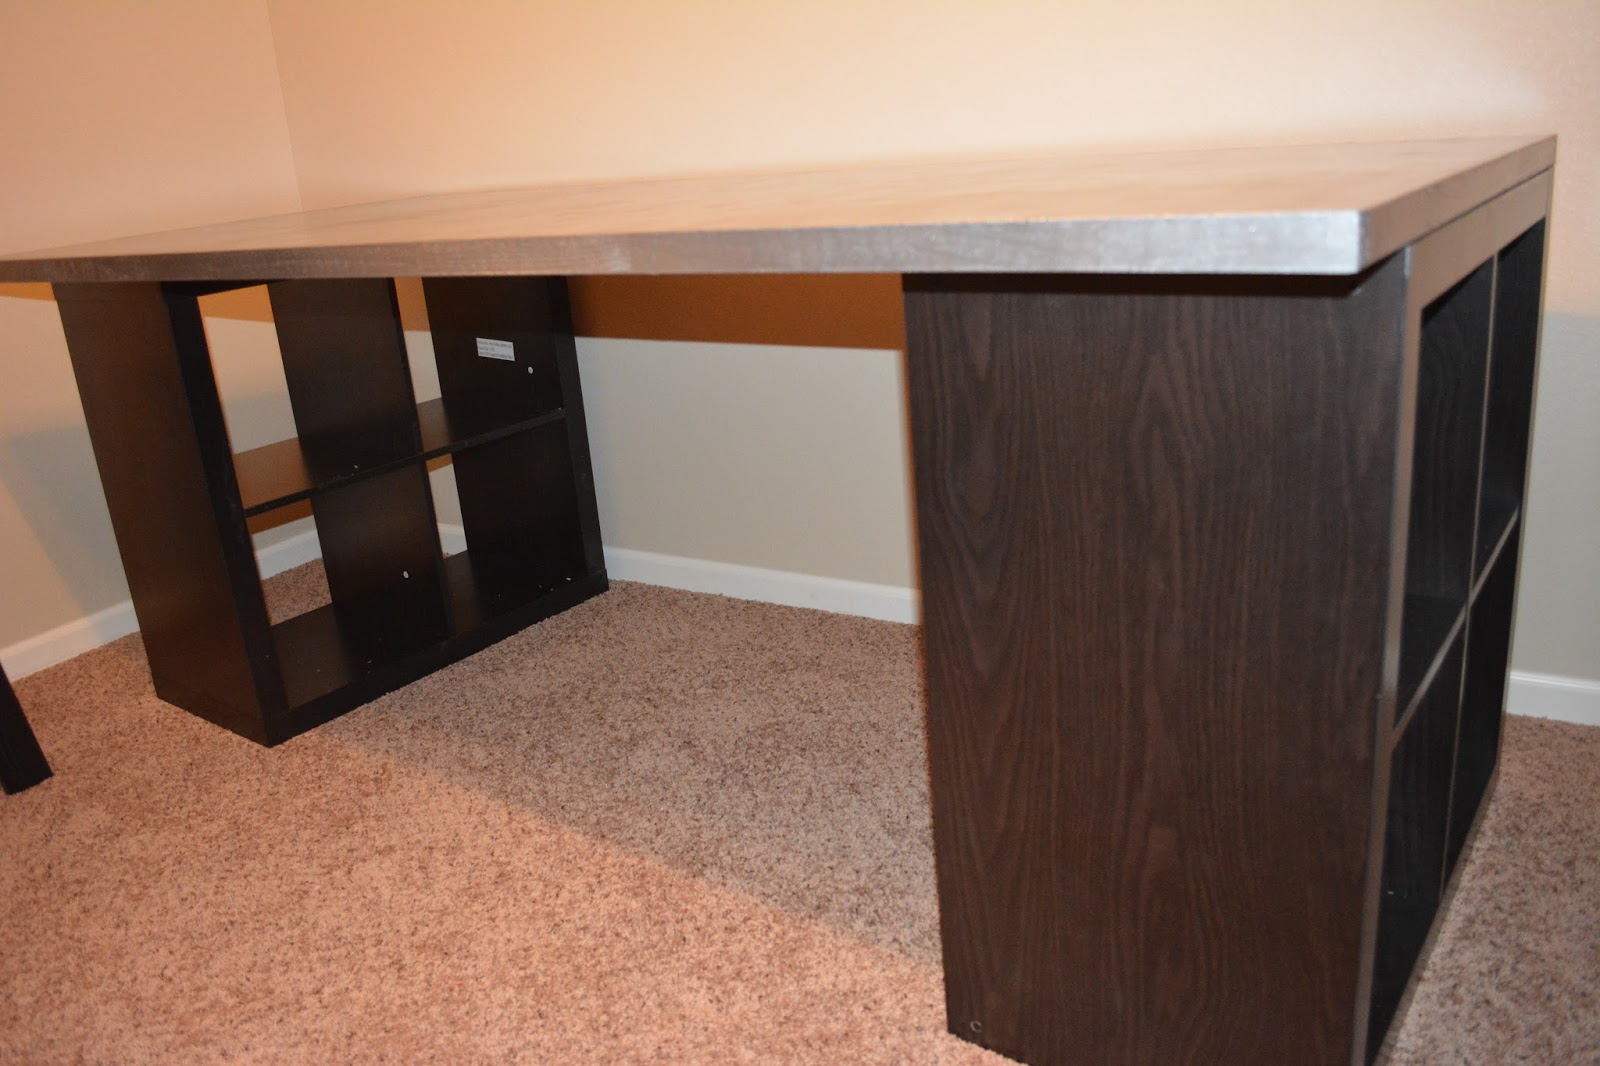


After completely drying comes the L brackets. I pre-drilled the holes first and then drilled the screws into the door, and insides of the storage table thingys. Make sure you do the inside of the tables so it's not so noticeable. AND before drilling everything make sure the table top is exactly where you want it placed on the storage bin thinga-mabobs. My husband was working for this part, and it was a pain to make sure they were staying in place so if you can get an extra sturdy hand to hold them suckers in their place that would be best. BUT, you can do it on your own... hence the D-I-Y (do it yourself) lol. :)


OMG. Most expensive part of this whole project was picking out a chair. I wanted to re-do a chair found on Craigslist or something but....I'm impatient with excitement. So, I bought this bad boy at TJ Maxx for $89 on clearance (ha, love my clearance). I had a $10 off coupon so the actual price was $99 before the coupon. Completely worth the price in my opinion. It's beautiful, extremely comfortable, stylish, and perfect for this space. Pretty sure it's made by Cynthia Rowley. This is optional obviously, but I thought I'd share my love for this expensive butt cushion. I'm kind of obsessed if you couldn't tell. . . 


LOL, please excuse the dirty printer that was sitting in it's box for a couple months in storage. Hey, at least it has a special place now. But that's it! It's super sturdy and perfect for all my DIY's, crafts, or whatever I want to use it for. Eating cake on? I don't know it's awesome. I also added little shelves, and I got those at Target on clearance for $4 for both. I put the one in the middle so I could put my tablet there if I wanted to watch a YouTube video or music etc. Sooo yup, thanks for stopping by and reading another DIY post from yours truly. Have any questions or comments? Post below! 

Until Next Project.....


Wednesday, April 30, 2014

DIY Lace Jeans (easy fix)


Hello lovely peeps, I've got another super fast and easy DIY for you today.
DIY Lace Jeans. When I say this is easy, I mean it is done in 20 minutes or less. Recommended drying time is 24 hours, but as far as doing the project.... easy peasy. I absolutely love my Silver Jeans mainly because they were destroyed, but the holes got a LOT bigger. Ha, thinking about it I actually tried wearing them out with the larger holes and people stared me down. So, I got crafty and thought about what I found on Pinterest years ago. So this is my take on it, and if you'd like to do it too please continue reading!


  • You're going to need a good ol' pair of destroyed jeans or shorts (or destroy them yourself).
  • A pair of scissors
  • Some fabric glue. The kind I used was "Liquid Stitch Stitchless Sewing". I purchased mine at Hobby Lobby for $4.99
  • Some lace fabric, I bought a yard (but you could use less). Also purchased at Hobby Lobby. It was $8.99 a yard but I had a coupon for 40% off.

Turn your lovely jeans or shorts inside out, and smooth out the surface as much as possible. If you have to iron before hand I would do so now. You want a clean smooth surface to work with :).


Take you lace fabric and line it up to the outside and inside of the stitching for the width. For the length will depend on how many holes you're covering. I made a large piece because I have a lot of holes to fill. 


Then cut along the outside stitching.


It should look something like this for both legs, or one if that's what you're doing.


Take your fabric glue, and make a small dot under each corner of your fabric so you know where the lace will lay. Take the lace off and set to the side. Then place the glue all over the surface where your lace will sit, staying away from the center of the open holes. You can do the edging but be careful to go lightly around the holes. 


Grab your lace that you set aside and place on top of the sticky glue. You can either use a sponge to firmly smooth the lace over the glue, or just use your good ol' hands like I did. Definitely wasn't the most exciting feeling in the world, but it washed off with regular tap water :). Just make sure to smooth out the surface and press all over the surface to insure a good hold.


Yay! Hard part is done. Don't mind my fabulous no makeup mug.


Now, ironing is optional but I took a piece of an old jean patch and used it for a buffer between the lace and the iron. Put the iron on the "cotton" setting and very gently go over the jean patch till it is warm. Then, slowly take the jean patch off and repeat to each surface that has not been touched yet. This just helped it dry a tad so I could take the after photo for you guys. :D But it can also insure that it's not going anywhere!


After that all you have to do is lay them out to dry for 24 hours and viola! You vamped up some old jeans that you were probably thinking about ditching! It's almost like you have a new pair of jeans without buying them. Like I said, these are my favorite jeans and for about $10 I saved them. One of the easiest DIY's I have ever done! Hope this inspires you to get out those old jeans (or new) that you'd like to add a little extra too.
Get out there and start crafting people, it's too easy not to :).

Questions or Comments? Post below!
Until Next Project, Thanks for stopping by.... :P


Monday, April 28, 2014

Sigma Premium Professional Kit


Lets just start off by saying my husband is basically AHHMAZING. I've been wanting this Sigma set for awhile now, but have been pushing it back because it's... well.... pricey. Is it worth it? I'll get into that later in this post. 


Sigma has blown up all over social media over the last few years. From YouTube gurus to bloggers, and all over the beauty industry. It's was founded in 2008 by a husband and wife team originally from Brazil. They had a mission to make Beauty Products for a more affordable price, but durable with high end features. Their brushes are used from small beginners to top end worldwide makeup artists. Word got around fast about these brushes, and for a good reason. 


It comes in this gorgeous thick case! As soon as I pulled it from the box I hugged it, looked like a total weirdo doing it and I didn't care at all. My husband knew I wanted it, but I don't think he realized how bad I wanted it till he saw the craziness coming from the other side of the couch. The case itself is amazing. It's absolutely perfect for travel or keeping your brushes in a safe secure place where they wont get messed up. It also helps that it's one of my favorite colors, like a flat black. Amazzzin. :)


Pictured above are the face brushes in the kit:

(from left to right)
  • Large Fluff - E50 (perfect for highlighting on cheek/brow)
  • Concealer - F75 (great for using defining around lips/brows)
  • Large Concealer - F65 (typical for larger areas of concealing)
  • Tapered Highlighter - F35 (subtle highlighting ex. cheek bones)
  • Duo Fibre Powder/Blush -F15 (for a diffused blush application)
  • Powder/Blush - F10 (great for precise placement of powder or blush)
  • Tapered Face - F25 (gives exact placement of product on the face)
  • Large Powder - F20 (omg, big huge soft brush, amazing for bronzing)


Eye brushes (and one lip brush, far left)
  • Lip - L05 (perfect lip brush with a cover to bring on the go etc)
  • Small Eye Liner - E10 (works well with gel or liquid eye liner)
  • Flat Definer - E15 (sharp and precise for product along upper/lower lash line)
  • Short Shader - E20 (apply in small areas or smudge out under eye)
  • Small Tapered Blending - E45 (color application for the crease)
  • Tapered Blending - E35 (effect is blended but defined w. this brush)
  • Blending - E25 (controlled blending brush, buff out harsh lines)


This is the Premium Professional Kit from Sigma. Like I said earlier, I've been wanting this set FOR-EVER. I was absolutely shocked when this came in the mail for me from my husband. It was my 25th birthday this last Saturday (the 26th). Bryan surprised me by going above and beyond this year! I wont go into full detail but lets just say I effing love that man. He did good, real good. 


These brushes are purely amazing. I love them already and I haven't put in for a trial and error (but I will, and will update). I had one brush before this kit and that was the F80 Flat Top Kabuki. Aka, one of the greatest foundation brushes out there. I bought it off of ebay, because it was cheaper for me at the time. This thing is incredible! Yes, I know everyone raves about it. There's a reason for that! After I started using this brush I almost felt stupid for not finding this sooner. Makes your foundation look flawless and almost airbrushed. I clean it regularly and it still stands up to my expectations after every wash. I have never seen any hair fall out or anything! Very sturdy and you can tell it'll last you a long time. Once I had this brush, I knew I needed the rest.


In conclusion I love these brushes, even though I just started using them.... today. So with that said I will update for a trial and error in a couple of months. They're beautiful high quality brushes for an amazing price. M.A.C. has nothing on Sigma.. nothing. 

Questions or comments? Post below. These were not sent to me, these were a gift from my husband. All opinions are my own and I would never mislead anyone of any product reviewed by myself. Have things you'd like to send for me to review? send an email here.

Thanks for stopping by.


Wednesday, April 23, 2014

Bloglovin

<a href="http://www.bloglovin.com/blog/12165595/?claim=rpupktc3xzr">Follow my blog with Bloglovin</a>

DIY Frame Collage


THE INFAMOUS COLLAGE WALL AT THE KLEIN HOUSE:

Hello loveys! Here's another DIY idea for y'all out there. Over the years I've had many decorations kind of piled up in storage. Well, we moved into the new house and had big new walls to cover. So with that in mind I kind of just winged this idea together and this is what I came up with!


Now, I don't have an exact tutorial for this idea since I just kind of put it together, but I can at least explain the concept and how I came up with it.


With a majority of things that I have in our home I have either made, got for free, re-did, or purchased from one of the following stores (yes, these are my all time FAVORITE stores):
  • TJMaxx
  • Marshall's
  • Ross, Dress for Less
  • HomeGoods
  • Hobby Lobby
  • Amazon

  • I never pay for anything that is full price. I'm not the person to go to Pier 1 or PotteryBarn to purchase one small thing for $40. Now, there's nothing wrong with that, but I just like to find things A LOT cheaper. More money in my pocket makes not only me, but my husband happier haha. 

    My husband was in the Marine Corps for 4 years, so we take a lot of pride in that. During his last deployment to Afghanistan I ordered the vinyl sign you see at the top. Can't remember where I ordered it from since it was almost 5 years ago (when I do find it, I'll add it). There are lots of websites that make vinyl signs or sayings for you. It's a little pricey, but worth it. This is one thing I had to have, and obviously had to pay full price for. Now this sign was made for one purpose, and one purpose only. I bought it for our first home that we purchased. It took 5 years for us to finally purchase one (thanks to the VA Home Loan), and I finally could put this on a wall. So, that was my main focus for this wall everything else came after.

     I placed all the fun objects that I wanted on the wall near the sign, placing and adding as I went. Using a small level from an old ruler I placed marks for the nail holes so they were even. And honestly that's about it! The great thing about a collage is that you can add anything to it. I imagined this would be great for future children and events throughout our lives together. :) What do you think?? I'd love to hear or see your ideas! Question or comments? Leave a comment!

    Until the next project, thanks for stopping by...